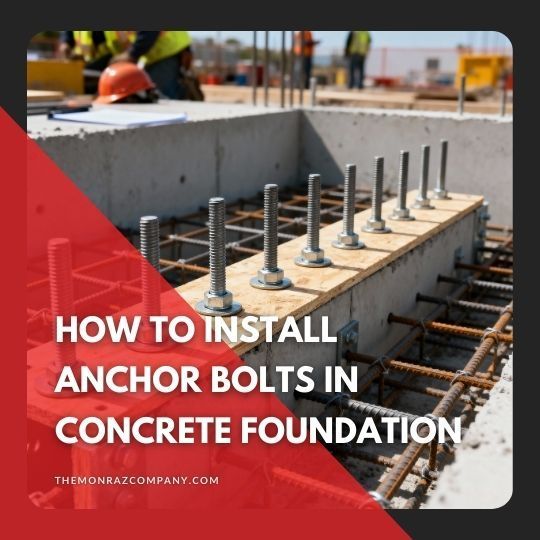
How to Install Anchor Bolts in Concrete Foundation
Concrete is one of the most effective base materials for any structure. However, it’s particularly helpful for commercial and industrial properties. Concrete provides exceptional strength, unmatched durability, and essential long-term stability.
It’s also resistant to moisture, fire, pests, rot, temperature fluctuations, and even seismic forces common in Southern California. Though concrete is the ideal choice for foundations, getting the most structurally sound final product takes expert execution.
One component contractors will need to use accurately is anchors or anchor bolts. To ensure each project is both structurally sound and compliant with industry standards, it’s important to understand what anchor bolts do and how they’re properly installed. Therefore, in this post, we will break down both—explaining their purpose and methods contractors rely on for accurate installation.
If you want professional results backed by years of construction expertise, TMC Engineering can help. Our team specializes in concrete foundation work, structural anchorage, and seismic-ready building solutions.We ensure every project is completed safely, precisely, and in full compliance with local codes.
Reachoutto us for expert support on your next commercial or industrial foundation project.
How to Install Anchor Bolts in Concrete Foundation
In this guide, we’ll explain what anchor bolts are, the different types available, and the appropriate installation depth. We’ll also outline how to properly install anchor bolts if you’re pouring your own concrete foundation.
What Is an Anchor Bolt?
An anchor bolt is a threaded fastener that contractors use to securely connect components to concrete. More specifically, anchor bolts are designed to transfer loads into the concrete, keeping the structure firmly secured to the foundation. By embedding one end of the bolt into the concrete and leaving the other exposed, you can attach structures, framing members, or equipment.
Anchor bolts come in several materials, including stainless steel, when a project requires stronger corrosion resistance or exposure to harsh environments. The embedded bolt forms a strong, permanent connection that helps the foundation resist heavy loads and seismic forces.

What Are Anchor Bolts Used For?
Anchor bolts serve a wide range of specific applications, especially in commercial and industrial construction. Some specific examples include:
- Securing structures to concrete: They fasten sill plates, steel columns, equipment bases, and structural framing to the foundation.
- Resisting uplift forces: They keep the building anchored during high winds or seismic activity.
- Preventing lateral movement: They resist sliding and shear forces caused by earthquakes, soil pressure, or impact loads.
- Transferring structural loads: They connect walls, beams, and columns to the foundation so loads move safely into the ground.
- Supporting heavy machinery: They hold industrial equipment, mechanical units, and steel supports firmly in place.
- Maintaining structural alignment: They help keep walls straight and ensure framing lines match the foundation layout.
- Ensuring code compliance: Anchor bolts satisfy building code requirements for structural safety, especially in seismic regions like Southern California.
- Supporting exterior site structures: They secure items such as light poles, sign bases, or canopy footings to concrete pads.
How to Put Anchor Bolts in Concrete Foundation
Step 1: Review the engineering plans.
Before adding anchor bolts, it is essential to verify all the specifications in your engineering plans. This includes verifying the correct bolt size, spacing, embedment depth, projection height, and hardware specifications such as washers and nuts.
The plans will also indicate what the engineers designed each anchor bolt to support. They may be equipped for sill plates, structural steel connections, hold-downs, or heavy equipment.
Additionally, the plans will note any seismic-specific requirements laid out by your local building codes. In Southern California, guidelines require anchor bolts to be strong enough to resist significant
uplifts and lateral forces from earthquakes.
Step 2: Prepare templates or sill-plate guides.
Cut manufactured steel or plywood templates that perfectly match the measurements on the engineering plans. Each template should have pre-drilled holes and markings, such as bolt orientation and plate direction. You should also indicate which side is “up” and which is “down.”
These templates will ensure the bolts remain precisely spaced and aligned during the concrete pour. Once they are complete, fasten them to the formwork using screws, nails, or clamps. The templates cannot shift during the concrete pour, or you will risk compromising the foundation. Before moving on to the next step, re-check all measurements with the engineering plans to ensure the bolt markings are accurate.
Step 3A: Set anchor bolts before the pour.
There are two options when using anchor bolts. The first is to set them prior to your concrete pour. To do this, you insert each bolt through the template and wet concrete. The bolts will hang down into the formwork, allowing the embedded ends to sit inside the slab once the concrete is poured. When the surface is finished, the threaded tops remain exposed and perfectly aligned for your sill plates or structural hardware.
Tighten each nut and washer against the template, but keep them just loose enough to allow for minor adjustments. Once they are set, confirm that the hooked or plate end meets the required embedment depth. Then use a tape measure, framing square, and level to verify accurate spacing, plumb alignment, and straight rows.
Step 3B: Insert bolts during the pour.
For the second option, you may insert bolts during the pour. To begin, lay your concrete and allow it to settle slightly. While the concrete remains workable, insert the anchor bolts. You will have to work quickly to ensure the concrete does not dry and begin curing before you are done. Ensure you have enough workers to complete the task in a timely manner.
To insert the bolts, push them straight down into the template until they reach embedment depth. Do not twist or rock the bolt, because this could prevent the concrete from effectively consolidating around the hardware. Then use a jig, a laser, or a taut string line to ensure all bolts are at consistent projection height.
Step 4: Confirm correct embedment depth.
Once you have placed all your bolts and poured your concrete, confirm the proper embedment depth of all installed anchors. Measure from the finished concrete surface down to the lowest part of the hook or anchor plate using a marked rod or depth gauge. Then cross-check those measurements with the engineering plans and any manufacturer specifications.
If any bolts are too shallow, too deep, or leaning into the concrete, adjust them immediately. You must make corrections while the concrete is still fresh and workable. Once your check is complete, all anchor bolts should have uniform embedment depths to ensure consistent load capacity.
Step 5: Maintain proper alignment and height.
Not only is the depth of the bolt important, but so is the exposed bolt height. There needs to be enough thread above the finished surface to accommodate washers, nuts, plates, and any other required hardware. To confirm this space is available, use a small level or laser tool.
Make sure each bolt is centered on the layout lines and maintains proper edge distance. Without this, you risk weakening the concrete. Additionally, these bolts may shift as the concrete consolidates and stiffens.
Monitor their alignment and height throughout the entire drying process and make prompt adjustments if necessary. Accurate placement protects the building’s structural integrity and ensures the foundation performs as engineered.
Step 6: Vibrate the concrete around the bolts.
Air can sometimes get trapped between the bolt and the concrete, which ultimately affects proper consolidation. To eliminate this trapped air and ensure the concrete settles properly, use a vibrator near each bolt while holding the exposed hardware.
This will prevent concrete segregation, voids, honeycombing, or incomplete fill around the bolts. If any issues arise during this phase, again take quick action to fix any problems before the concrete becomes unworkable.
For more on vibrators and other equipment mentioned in this post, read our guide on tools for concrete.
Step 7: Allow the concrete to cure.
While your concrete is curing, leave the forms in place and ensure your surface remains covered until it reaches maximum strength. Before hardware installation or framing of your building begins, the concrete foundation must be completely cured.
How long it takes concrete to cure depends on temperature, moisture, and other environmental factors. For more, read our post called When Can You Pour Concrete?
While the concrete is curing, avoid tightening nuts or applying load to the anchors. A professional needs to confirm compressive strength before moving forward with construction. The engineering standard for strength is typically 2,500–3,000+ PSI for foundation work.

How Deep Should Anchor Bolts Be in Concrete Slab Foundations?
Anchor bolt embedment depth depends on bolt type, diameter, and the weight placed on the finished slab. Engineers determine and specify exact depths in the structural plans. You must follow those values—especially in high-seismic areas like Southern California, where buildings require deeper embedment for uplift and lateral resistance.
Common embedment ranges based on the type of anchor bolt include:
- Cast-in-place J-bolts (for sill plates/light framing): Often require 7 to 12 inches of embedment in the concrete, depending on the bolt diameter and the design loads
- Heavy-duty cast-in anchors (for columns or equipment): May require 12 inches or more of embedment
- Post-installed mechanical anchors (wedge anchors/sleeve anchors/expansion anchors): Usually need a depth of 8 to 12 bolt diameters into sound concrete.
- Epoxy or adhesive anchors: Rely on the anchor size, adhesive system, and load requirements to determine embedment depth, which often reaches 8 to 15 inches or more in structural applications
The key is ensuring the embedment matches the engineered design so the anchors achieve full strength. Shallow embedment can lead to pull-out failures or concrete breakout. Additionally, excessive embedment may conflict with reinforcement or tested installation limits. Always verify depth during placement while the concrete is still workable.
Anchor bolts are essential to securing structures, equipment, and framing components to concrete foundations.
Installing anchor bolts takes careful planning and precise execution, and each detail influences how the structure performs over time. When you position the bolts correctly, the foundation handles heavy loads and seismic forces without issue. Proper installation strengthens the building’s stability and keeps it aligned with the engineer’s design intent.
If you want skilled professionals who understand the importance of proper anchorage and foundation work, contact TMC Engineering. Our team delivers precise, code-compliant concrete installations for commercial and industrial projects.
For additional information on any concrete construction needs, read: