What Is Epoxy Paint?: All You Need To Know
Epoxy paint has surged in popularity over the last decade, becoming a go-to solution for residential and commercial property owners seeking durable, stylish, and low-maintenance surfaces. Its dominance in flooring applications, particularly for garage floors, basements, and industrial spaces, is due to its unmatched resilience and sleek high-gloss finish.
Whether you’re renovating your offices, industrial spaces, or commercial kitchens, understanding epoxy’s unique properties helps you leverage its benefits effectively. In this guide, you’ll learn what epoxy paint is, where to use it, and how to apply it like a pro.
If you would like a quicker or more elaborate answer to your repair and construction questions, call the experts at TMC Engineering ! If you're in Southern California, we can instruct you on your problem and perform whatever repair is necessary. We've got an expert solution for all your asphalt or concrete needs!

What Is Epoxy Paint?
Epoxy paint is a two-part coating system made by mixing epoxy resin with a hardening agent (polyamine). This chemical reaction creates a rigid, plastic-like material that bonds tightly to surfaces, forming a protective layer. Unlike traditional floor paint, which sits on top of surfaces, epoxy penetrates porous materials like concrete, creating a seamless, resistant-to-chemicals, and easy-to-clean finish.
Key Differences Between Epoxy and Standard Paints:
- Durability: Epoxy forms a thicker, harder surface that resists chips, cracks, and abrasions.
- Adhesion: Its molecular structure allows it to grip surfaces more effectively than acrylic or latex paints.
- Chemical Resistance: Epoxy withstands oil, gasoline, and household cleaners, making it ideal for garages and workshops.
- Curing Process: While standard paints dry through evaporation, epoxy undergoes a chemical cure, hardening into a solid plastic-like layer.
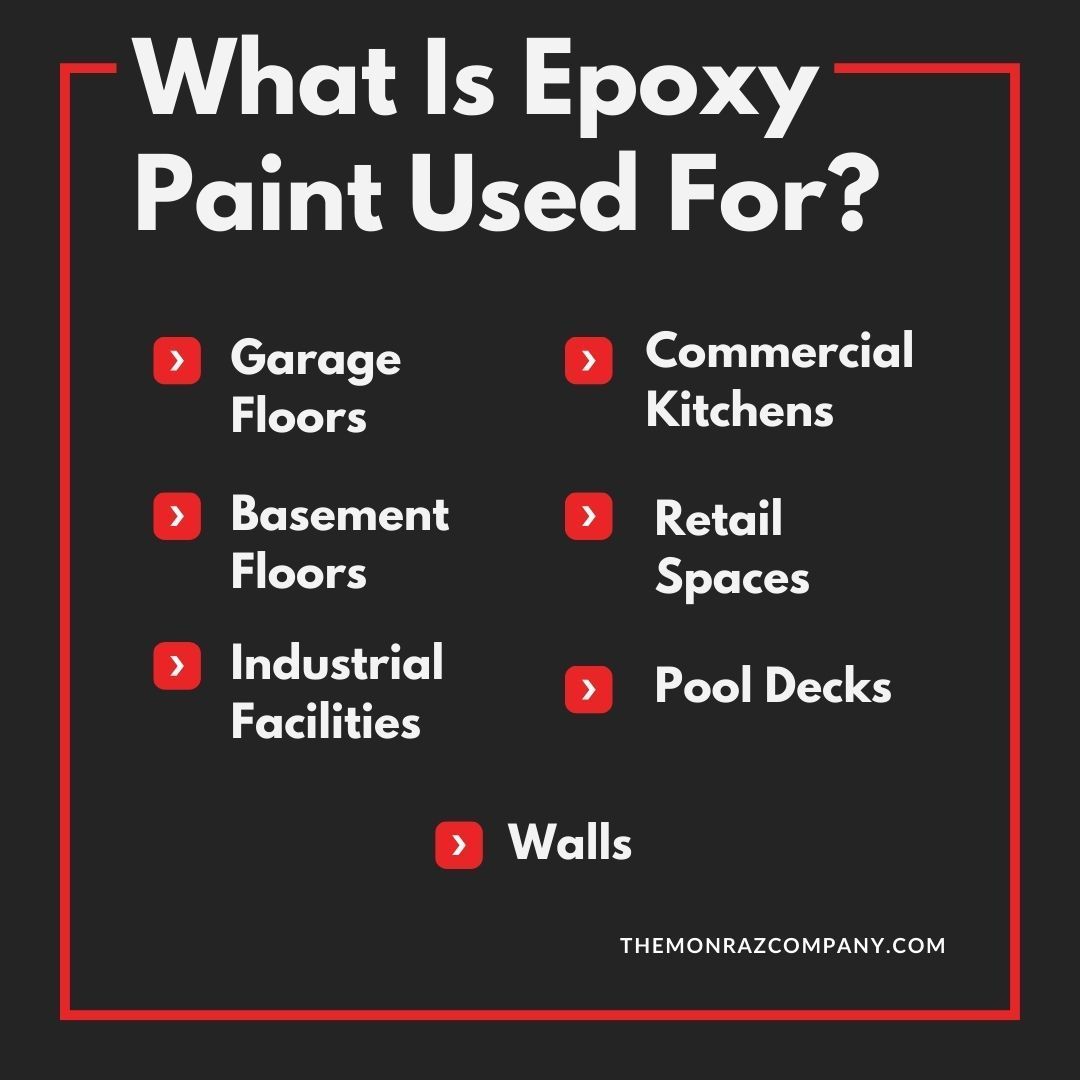
What Is Epoxy Paint Used For?
Epoxy’s versatility makes it suitable for a wide range of residential, commercial, and industrial spaces. Below are its most common applications:
- Garage Floors: Protects against oil stains, tire marks, and heavy equipment
- Basement Floors: Prevents moisture damage and adds a polished look
- Industrial Facilities: Withstands heavy machinery, chemical spills, and foot traffic
- Commercial Kitchens: Offers a resistant-to-chemicals surface that meets hygiene standards
- Retail Spaces: Enhances aesthetics with customizable colors and decorative flakes
- Pool Decks: Provides a slip-resistant finish that handles constant water exposure
- Walls: Creates wipeable, stain-proof surfaces in labs, hospitals, or garages
While epoxy flooring is the most common application, you can also apply it to metal, wood, and masonry with proper surface prep.
How To Apply Epoxy Paint
Applying epoxy paint requires precision to ensure strong adhesion and a flawless finish. Below, we break down the process for three common surfaces: garage floors, walls, and basement floors.
How To Apply Epoxy Paint on Garage Floor
Step 1: Clear the area.
Remove vehicles, tools, and debris from the garage. Sweep the floor thoroughly, then use a degreaser to eliminate oil stains or residue. Rinse with water and let it dry for 24 hours.
Step 2: Etch the concrete.
Mix a concrete etcher (muriatic acid or phosphoric acid) with water and scrub the floor with a stiff brush. This opens the concrete’s pores, helping the epoxy coating bond effectively. Rinse again and let dry.
Step 3: Apply primer (If needed).
For heavily damaged floors, use an epoxy primer to fill cracks and create a smooth base. Roll it on with a nap roller and let it cure as per the manufacturer’s instructions.
Step 4: Mix the epoxy.
Combine the resin and hardener in a bucket, stirring slowly to avoid air bubbles. Let the mixture sit for 10 to 20 minutes (induction time) to activate.
Step 5: Spread the first coat.
Use a roller with a ½-inch nap to apply epoxy from the farthest corner toward the exit. Work in small sections to maintain a wet edge and avoid lap marks. Let it cure for 12 to 24 hours.
Step 6: Add decorative flakes (Optional).
Sprinkle color flakes onto the wet epoxy for texture and style. Wait 30 minutes, then sweep away loose flakes.
Step 7: Apply the topcoat.
Add a clear polyurethane or epoxy topcoat for extra durability and shine. Let it cure for 72 hours before driving on it.
How To Apply Epoxy Paint on Walls
Step 1: Clean the surface.
Wash walls with TSP (trisodium phosphate) to remove dirt, grease, or mold. Rinse with water and let dry completely.
Step 2: Sand and repair.
Sand glossy paint or uneven areas with 120-grit sandpaper. Fill holes or cracks with spackle, then sand smooth.
Step 3: Tape and protect.
Use painter’s tape to mask trim, outlets, and adjacent surfaces. Lay drop cloths to protect the flooring.
Step 4: Mix the epoxy.
Combine resin and hardener as directed. Stir gently to prevent bubbles, then let it sit for 10 minutes.
Step 5: Apply epoxy with a roller.
Use a foam roller for smooth walls or a nap roller for textured surfaces. Start at the top and work downward in “W” or “M” patterns. Maintain even pressure to avoid drips.
Step 6: Address the edges and corners.
Cut in edges with an angled brush, blending into the rolled sections. Remove the tape before the epoxy dries.
Step 7: Allow proper curing.
Avoid touching the wall for 24 hours. Full cure takes about 5 to 7 days, depending on humidity.
How To Apply Epoxy Paint to Basement Floor
Step 1: Test for moisture.
Place a plastic sheet on the floor, seal the edges with tape and wait for 24 hours. Condensation under the sheet indicates moisture issues. Seal the floor with a concrete sealer if needed.
Step 2: Clean and etch.
Scrub the floor with a degreaser, then etch with acid to roughen the surface. Rinse thoroughly and let dry for 24 hours.
Step 3: Fill the cracks.
Use hydraulic cement or epoxy filler to repair cracks. Sand smooth once dry.
Step 4: Apply epoxy primer.
Roll on a moisture-blocking primer to prevent efflorescence. Let it cure as directed.
Step 5: Mix and apply epoxy.
Combine resin and hardener, then spread with a roller. Work in 4x4-foot sections, overlapping each pass by 50%.
Step 6: Add anti-slip additives.
Mix silica sand or aluminum oxide into the second coat for traction. This is especially ideal for damp basements.
Step 7: Allow to cure completely.
Allow the floor to cure for 5 to 7 days before placing any furniture or rugs.
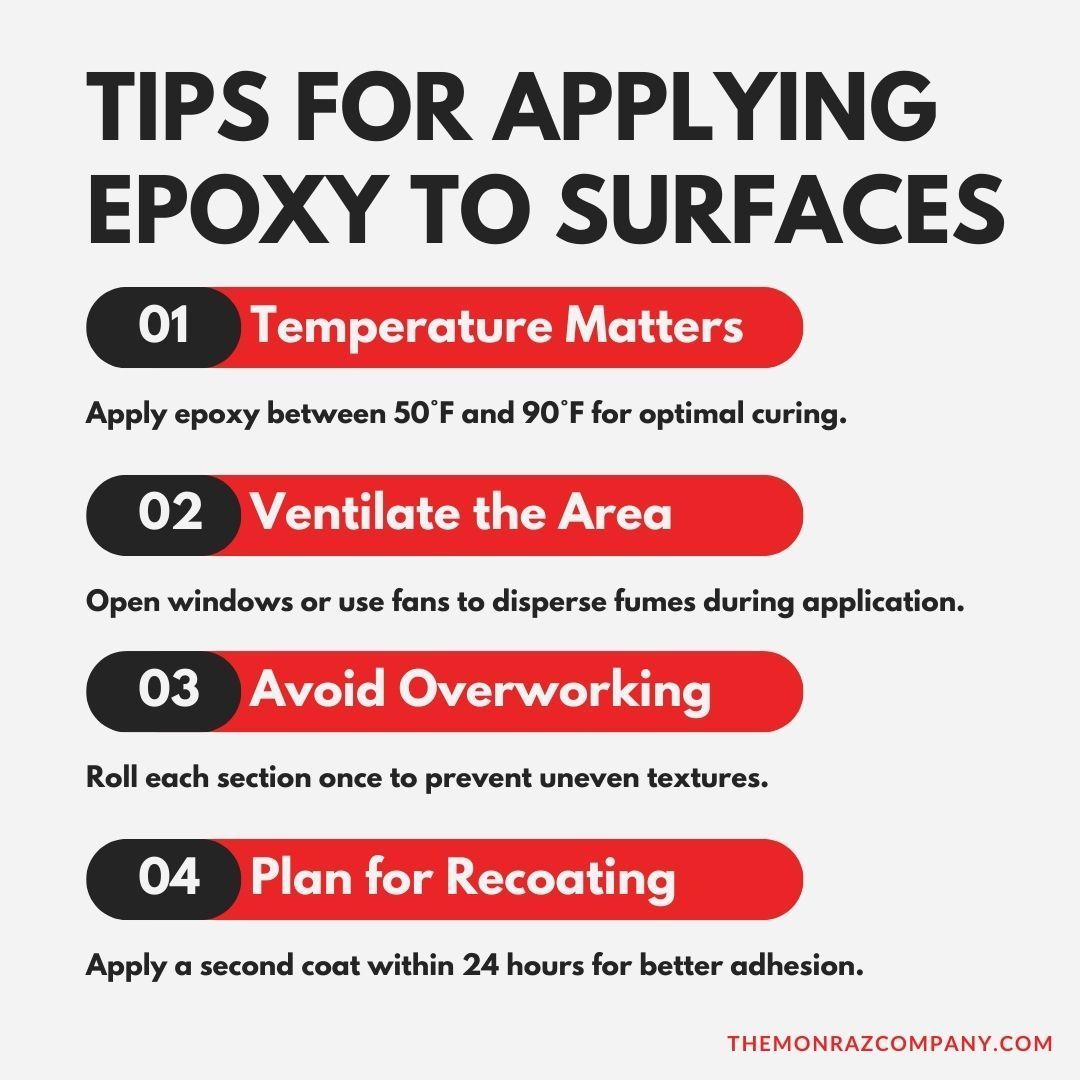
Tips for Applying Epoxy to Surfaces
Some important factors to consider when applying epoxy include:
- Temperature Matters: Apply epoxy between 50°F and 90°F for optimal curing.
- Ventilate the Area: Open windows or use fans to disperse fumes during application.
- Avoid Overworking: Roll each section once to prevent uneven textures.
- Plan for Recoating: Apply a second coat within 24 hours for better adhesion.
Despite its durability, epoxy may need removal due to improper application, wear, or design changes. If you face this scenario, follow our detailed guide on how to remove epoxy from concrete to avoid damaging the concrete.
Whether you’re coating a garage floor or revitalizing basement walls, epoxy delivers a professional-grade finish that’s easy to clean and built to last. At TMC Engineering, we have the expertise to apply epoxy to your surfaces. Our professionals have the experience and technical know-how to ensure effective and efficient application. Contact us to discuss solutions for your commercial property!
The key to a successful epoxy paint application is proper surface preparation and following the manufacturer's instructions.
Epoxy paint’s blend of aesthetics and functionality makes it a standout choice for wall or flooring applications. By following the steps above, you can achieve a glossy, resistant-to-chemicals surface that elevates your space’s practicality and style.
Remember, proper prep and patience during the curing process are key to unlocking epoxy’s full potential. For stubborn epoxy removal or large-scale projects, consider consulting professionals to ensure flawless results.
At TMC Engineering, we have a deep commitment to delivering projects characterized by the highest standards for safety, workmanship, and client satisfaction. We aim to provide you with valuable content and insights related to the services our team of experts provides!
Whether you require asphalt paving, striping, sealing, or concrete work, we offer a full suite of transportation construction solutions. Look no further we’ve got all you need and more!